 |
For this lesson you'll need a slide that has three or more objects.
In this lesson you'll learn how to group, ungroup, align, and overlap objects.
The topics in this section are:
Use the Group command to define two or more objects as one. You can adjust the size of grouped objects or move their location.
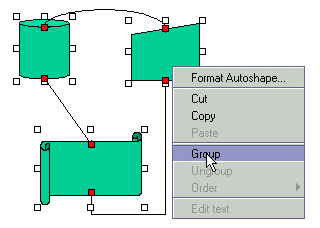
1. Select two or more objects.
2. Select Format | Group, or Right-click the mouse and select Group in the popup.
Note: If the objects are connected, it is best to select the connectors, too.
|
Right Click Group
3. Notice that the selected objects assemble into one object with one set of handles.
4. Experiment with changing the object's size and moving it. (If you rotate the group, connectors will disconnect.)
5. Select a grouped object and use Group to add another object to it. (Add more objects to your slide if necessary.)
Note: A line is also an object and can be grouped.
6. Experiment with grouping, grouping groups, and manipulating grouped objects until you are satisfied that you understand the process and the effects you can produce.
Use Ungroup to reverse the Group command.
1. Select a previously grouped object to ungroup.
2. Select Format | Ungroup. Or Right-click the mouse and select Ungroup in the popup.
3. Notice that the previous grouped object disassembles into separate objects in reverse order of grouping.
This feature aligns the height and width of drawing objects, based on the last object selected. For example, if the last object is 1 inch wide, the other objects will be made 1 inch wide.
1. Select the objects individually, using the <Shift> key, for which you want to align size.
2. Select Format | Align Size | <option> (one of the following):
All changes both width and height of selected objects.
Horizontal changes width of selected objects.
Vertical changes height of selected objects.
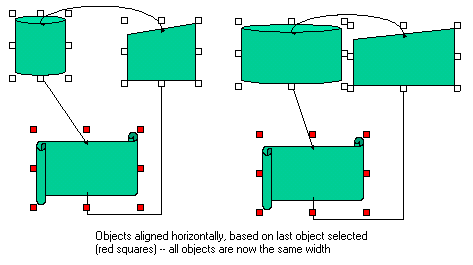 |
Aligning Size Horizontal
Remember: The height and width of the selected objects will be adjusted to that of the LAST selected object. Further, text boxes can only be aligned horizontally (vertical is automatic, based on horizontal).
3. Experiment with aligning sizes until you are satisfied that you understand the process and the effects you can produce.
This feature lets you align three or more selected objects to the left, right, or center (horizontally), or, to the top, middle, or bottom (vertically) -- with respect to the last selected object.
1. Select three or more objects you want to align.
2. Select Format | Align Area | <option> (one of the following):
Align Left left-aligns all selected objects.
Align Center centers all selected objects.
Align Top top-aligns all selected objects.
Align Middle middle- aligns all selected objects.
Align Bottom bottom aligns all selected objects.
Distribute Horizontally distributes selected objects with equal space horizontally. You must choose three or more objects, but if you choose the Adjusting to the Size of Slide, only one object can be put at the center horizontally.
Distribute Vertically distributes selected objects with equal space vertically. You must choose three or more objects, but if you choose the Adjusting to the Size of Slide, only one object can be put at the middle vertically.
Relative to Slide works with the other alignment options (above) to adjust objects against the four edges of a slide (not the selected objects). This option does nothing by itself; therefore, set this option before using one or more of the above options. If you choose Horizontal or Vertical Distribution after setting this option, it adjusts the objects against both the objects and a slide. This option not available on the Graphics Toolbar button.
3. Another way to achieve the same thing is to click the Align Area button on the Drawing Toolbar and choose the desired option. (See descriptions above.)
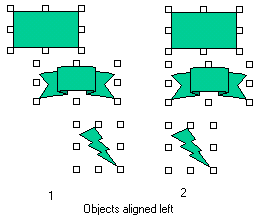 |
Objects Aligned Left
NOTE: Horizontal and Vertical Distribution distributes three or more objects with equal spaces.
4. Experiment with aligning objects in the area until you are satisfied that you understand the process and the effects you can produce.
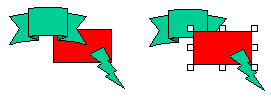
This feature lets you specify the order that objects are overlapped.
1. Make sure you have several objects in your slide. Move some objects so they overlap each other.
2. Select an object to move in front of, behind, on top of, or in back of another object(s). Use <ALT>/click to select an object beneath other object.
2. Select Format | Order | <option> (one of the following):
Bring to Front moves the selected object in front of all other objects.
Send to Back moves the selected object at the back of all other objects.
Bring Forward moves the selected object one level forward.
Send Backward moves the selected object one level backward.
3. Another way to accomplish the same thing is to Select the object, then right-click.
A popup menu will appear.
4. Select the desired option (same as above) from the popup.
 |
Object Bring Forward
How do you make the rectangle red? Double click the object and pick a color from the Drawing Attribute dialog box.
5. Experiment with changing the order of overlapped objects until you are satisfied that you understand the process and the effects you can produce.
Congratulations on completing this Lesson! To go to the next Lesson, click the bold link below.
Lesson 1: Startup and Tour of Toolbars
Lesson 2: Basic Operations, Inserting Textboxes and Text
Lesson 3: Working with Type Fonts and Textbox Attributes
Lesson 4: Paragraph indentation, alignment, line spacing, and bullets
Lesson 5: Inserting shapes and lines
Lesson 7: Grouping, ungrouping, aligning, overlapping objects
Lesson 8: Creating a Master Slide
Lesson 9: Inserting / deleting slides