 |
In this lesson you'll learn how to view, sort, and delete slides, set up background colors, and go to specific slides.
The topics in this section are:
Now that you have a Master Slide, experiment with adding text or graphics to each one.
1. From Slide Sorter view, double-click the first slide then add some text or graphics.
2. Similarly, create 3-4 more slides.
|
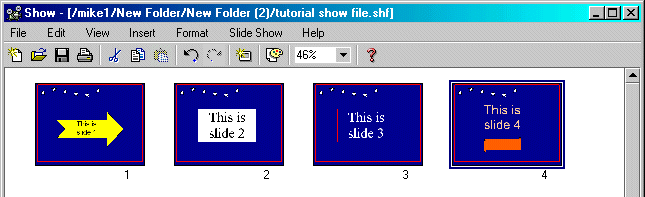
Sample Slides
1. Select View | Slide Sorter or click Slide Sorter ![]() button on Slide View Toolbar.
button on Slide View Toolbar.
The sorter window will display slide miniatures in proper sequence.
 |
Sorter View
2. Double-click any miniature to open it into the slide editor, .
3. To move any slide, click and drag it to a new position.
NOTE: You cannot move any slide in front of the first slide or after the last slide, however, you can move the first or last slide elsewhere. So, to move another slide into 1st position, move it to 2nd position, then move the 1st slide elsewhere. Use a similar process for changing the last slide.
4. Notice that all the new slides look the same as the Master slide.
5. Make at least one change to each slide so each is unique.
If you have many slides in your presentation, use Go To to jump directly to the slide you want.
1. Select Edit | Go To...
This brings up the GoTo dialog box, showing the current slide number (numbered sequentially from 1). Changing the slide order changes its number.
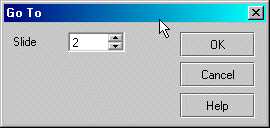 |
Goto Dialog Box
2. In the GoTo dialog box, enter the slide number you want to go to.
3. Click OK.
HINT: If you must view slides while moving from slide to slide, use Slide Sorter View, then double-click the slide to switch to slide view.
1. Select slide to delete.
2. Select Edit | Delete Slide, or select Edit | Clear, or press Delete on the keyboard.
In Slide View: deletes the slide at the current cursor location.
In Slide Sorter View: deletes the selected slide (with blue border).
NOTE: Deleted slides are not copied to the Clipboard.
Congratulations on completing this Lesson! To go to the next Lesson, click the bold link below.
Lesson 1: Startup and Tour of Toolbars
Lesson 2: Basic Operations, Inserting Textboxes and Text
Lesson 3: Working with Type Fonts and Textbox Attributes
Lesson 4: Paragraph indentation, alignment, line spacing, and bullets
Lesson 5: Inserting shapes and lines
Lesson 7: Grouping, ungrouping, aligning, overlapping objects
Lesson 8: Creating a Master Slide
Lesson 9: Inserting / deleting slides